The Patrol Phase determines what ground the players control at the start of the action and where they can deploy their forces once the game begins.
Players should read the Mission and check their objectives before the game begins. A good player, just like a good commander, will familiarise themselves with the ground over which their force will be fighting. The Patrol Phase allows them to manoeuvre to gain an advantage before committing their troops to action, using their patrols to seize or hold key ground.
Both sides use the number of Patrol Markers shown for that Mission, typically three or four and set these up as instructed. If the Mission allows either side any free moves, these are taken before the Patrol Phase begins.
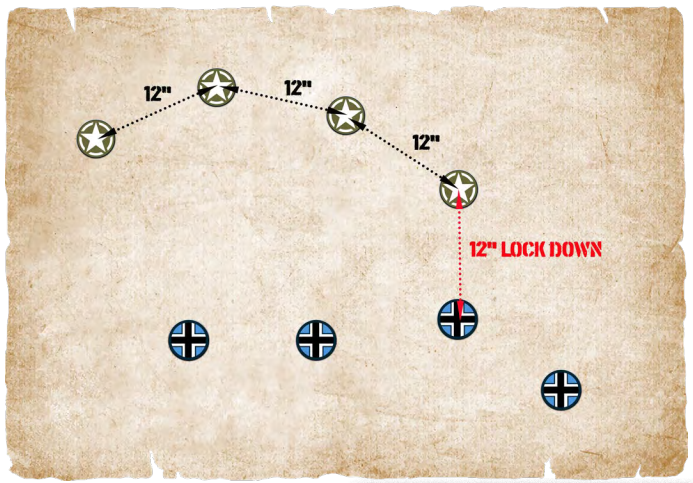
One Patrol Marker is moved up to 12" in a straight line, whilst also keeping it within 12" of at least one other friendly Patrol Marker. That distance is measured from the centre of the discs. Terrain does not affect the distance a Patrol Marker moves.
Once the player has moved their first marker, their opponent moves one of their Patrol Markers in the same way. This continues with the players taking turns to move their markers, one at a time.
Unless indicated otherwise in the Mission, all of each side’s Patrol Markers must form a continuous, unbroken chain, with each one positioned no more than 12" from at least one other friendly Patrol Marker.
When a marker reaches a point 12" from one (or more) enemy Patrol Marker, it will immediately halt, even if it has not moved the full 12" available to it. This Marker and the enemy’s Marker (or Markers if more than one is affected) are now locked in position and can make no further movement.
The players continue moving their remaining Patrol Markers until all of one player’s Patrol Markers are locked in position. At this point the Patrol Phase ends, even if the other side has Patrol Markers still not locked down. The Patrol Markers are then used to determine where the Jump-Off Points will be positioned.
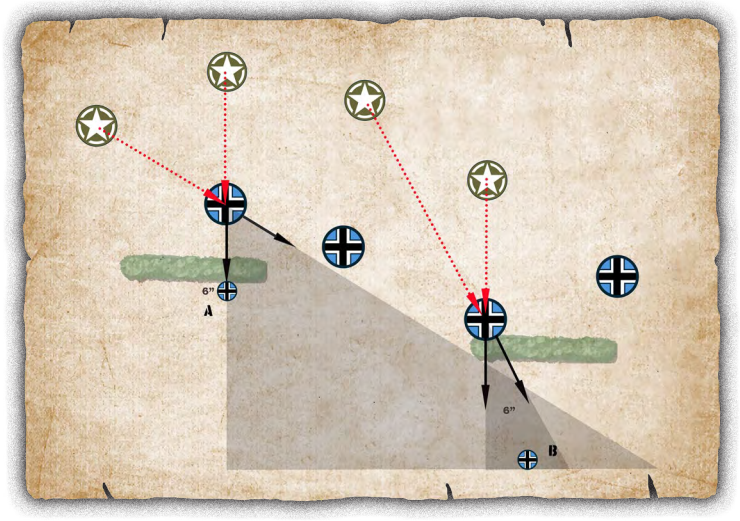
The player must select a position in cover, or immediately behind cover, which is at least 6" further away from the closest two enemy Patrol Markers and in the zone directly opposite them, as shown below. If no cover is available, the Jump-Off Point must be placed on the table edge within the zone generated.
If three or more enemy patrol markers are at an equal distance, the player chooses which two Patrol Markers they use to create the Jump Off Point.
In the example below, Jump Off Point A is placed behind the hedge as this puts it in cover and more than 6" from the Patrol Marker. Jump-Off Point B is placed on the table edge as it is not sufficient to have cover between it and the enemy Patrol Markers, but the Jump-Off Point must be in or immediately behind cover. If a Jump Off Point must be placed on a table edge, this can be any table edge, not just the players friendly table edge.
Where a Jump Off Point is placed in a building, this must be on the ground floor.
Once the first Jump-Off Point is placed, the opposing player repeats the process. Both players continue alternately, selecting a different Patrol Marker for each Jump Off Point placed.
This continues until all the Jump-Off Points for that Mission are placed on the table. The Patrol Markers are now removed and the game begins.